Saturday, December 6, 2008

Using Triggers In SQL Server /Implementing Trigger In SQL Server

Using Triggers In SQL Server /Implementing Trigger In SQL Server


A trigger is used to execute a bach of sql code when a specific event is fired. There are two types of trigger


1>AFTER TRIGGER.


2>INSTEAD TRIGGER.


AFTER TRIGGER is used after a specific event fired.An AFTER trigger is a trigger that gets executed automatically before the transaction is committed or rolled back.


A trigger which gets executed automatically in place of triggering actions i.e., INSERT, DELETE and UPDATE is called an INSTEAD OF trigger.INSTEAD OFtriggers gets executed automatically before the Primary Key and the Foreign Key constraints are checked, whereas the traditional AFTER triggers gets executed automatically after these constraints are checked.


How to execute TRIGGER


First Open the Enterprice manager


1)Start -> Programs -> Microsoft SQL Server -> Enterprise Manager.


2)Expand Sql Server Group->Expand Database->Click on Tables .
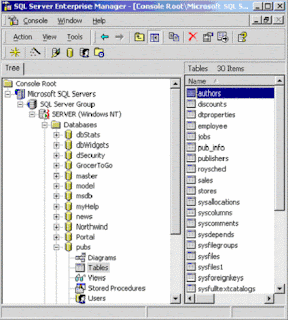


3)Right click on the table and choose All Tasks -> Manage Triggers.This will open the trigger properties window, which allows us to create a new trigger:
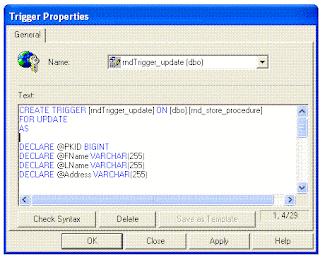


The syntaxt of the Create Trigger is shown bellow.


1)An example of fire TRIGGER After an INSERT


CREATE TRIGGER [rndTrigger_insert] ON [dbo].[rnd_store_procedure]


FOR INSERT

AS


DECLARE @FName VARCHAR(255)

DECLARE @LName VARCHAR(255)

DECLARE @Address VARCHAR(255)

DECLARE @StoredID BIGINT


SELECT @StoredID = (SELECT PKID FROM Inserted)

SELECT @FName = (SELECT FName FROM Inserted)

SELECT @LName = (SELECT LName FROM Inserted)

SELECT @Address = (SELECT Address FROM Inserted)


INSERT INTO rnd_trigger (StoredID,FName,LName,Address) VALUES (@StoredID,@FName,@LName,@Address)


In the above example it is shown rndTrigger object is created and it is fired when data inserted into table rnd_store_procedure.


When the TRIGGER is fired data also inserted into table rnd_trigger.


2) An example of fire TRIGGER After an DELETE.


CREATE TRIGGER [rndTrigger_delete] ON [dbo].[rnd_store_procedure]


FOR DELETE

AS


DECLARE @PKID BIGINT

DECLARE @Status BIT


SELECT @PKID = (SELECT PKID FROM Deleted)

SELECT @Status = (SELECT Status FROM Deleted)


if(@Status = 1)

BEGIN

RETURN

END


DELETE FROM rnd_trigger WHERE StoredID = @PKID


In the above example it is shown rndTrigger object is created and it is fired when data deleted from table rnd_store_procedure.


When the TRIGGER is fired it is checked the deleted record status is true or false.


If deleted record status is false then corresponding record also deleted from rnd_trigger.


3) An example of fire TRIGGER After an UPDATE.


CREATE TRIGGER [rndTrigger_update] ON [dbo].[rnd_store_procedure]

FOR UPDATE

AS


DECLARE @PKID BIGINT

DECLARE @FName VARCHAR(255)

DECLARE @LName VARCHAR(255)

DECLARE @Address VARCHAR(255)


IF NOT UPDATE(FName) AND NOT UPDATE(LName)

BEGIN

RETURN

END


SELECT @PKID = (SELECT PKID FROM Inserted)

SELECT @FName = (SELECT FName FROM Inserted)

SELECT @LName = (SELECT LName FROM Inserted)

SELECT @Address = (SELECT Address FROM Inserted)


UPDATE rnd_trigger set FName = @FName,LName = @LName,Address = @Address

WHERE StoredID = @PKID


In the above example it is shown rndTrigger object is created and it is fired when rnd_store_procedure is updated.


When the TRIGGER is fired it is checked the FName AND LName from record weather being modified or not.If record is being modified then record from table rnd_trigger also modified.


Sunday, October 19, 2008

Few Conceptual topic in Asp.Net usingc#

Importent Note:

We have to remember that static member and static method belongs to class rather than to the object of the class i.e we can access a static member or static method by class name.member name or class name.method name.
we cant access a static member or static method by creating a object of   that class.

Get and Set property in c#


When we using get and set property in c# we use First1 but not the Second1.

While we using Property function we have to remember the following pont
1)Property without a 'ReadOnly' or 'WriteOnly' specifier must provide both a 'Get' and a 'Set'.
2)Property Statement cannot appear within a method body.

Public Property Name() As String
Get
Return mName
End Get
Set(ByVal value As String)
mName = value
End Set
End Property

Its strongly recomended that we never use () after a poperty name.Because if we use () after property name then it will treat as a function not a property.Thats why we always use First1 not Second1

(Note:Get is use to read a Property and Set is use to write Property)


First1

public string getName


{


   get


   {


      return Name;


    } 


   set


   {


    Name = value;


    }


}


Second1

public string getName()


{


   get


    {


      return Name;


    } 


   set


   {


    Name = value;


    }


}


An example, which uses a set of methods, to access a private data field is shown below.


using System;

class MyClass

{

    private int x;

    public void SetX(int i)

    {

        x = i;

    }

    public int GetX()

    {

        return x;

    }

}

class MyClient

{

    public static void Main()

    {

        MyClass mc = new MyClass();

        mc.SetX(10);

        int xVal = mc.GetX();

        Response.Write(xVal);//Displays 10

    }

}


But C# provides a built in mechanism called properties to access private data member


The general form of declaring a property is as follows.          


<acces_modifier> <return_type> <property_name>

{

    get

    {

    }

    set

    {

    }

}


Above program can be modifies with a property X as follows.


using System;

class MyClass

{

    private int x;

    public int X

    {

        get

        {

            return x;

        }

        set

        {

            x = value;

        }

    }

}

class MyClient

{

    public static void Main()

    {

        MyClass mc = new MyClass();

        mc.X = 10;

        int xVal = mc.X;

        Response.Write(xVal);//Displays 10

    }


We have to rember that a property should have at least one accessor either set or get .The set accessor has a free variable available in it called value, which gets created automatically by the compiler. We can't declare any variable with the name value inside the set accessor.


Static Properties


The following program shows a class with a static property. 


using System;

class MyClass

{

    private static int x;

    public static int X

    {

        get

        {

            return x;

        }

        set

        {

            x = value;

        }

    }

}

class MyClient

{

    public static void Main()

    {

        MyClass.X = 10;

        int xVal = MyClass.X;

        Response.Write(xVal);//Displays 10

    }

}  


Note:Static property can access only other static members of the class. Also static properties are invoking by using the class name


Properties & Inheritance


The properties of a Base class can be inherited to a Derived class. 


using System;

class Base

{

    public int x ;

    public int X

    {

        get

        {


            return x+1;

        }

        set

        {

            x =value;

        }

    }

}

class Derived : Base

{

}

class MyClient

{

    public static void Main()

    {

        Derived d1 = new Derived();

        d1.X = 10;

        Response.Write(d1.X);//Displays 'Base SET Base GET 11'

    }

}


The above program is very straightforward. The inheritance of properties is just like inheritance any other member. 


Properties & Polymorphism


A Base class property can be polymorphicaly overridden in a Derived class. But remember that the modifiers like virtual, override etc are using at property level, not at accessor level. 


using System;

class Base

{

    public virtual int X

    {

        get

        {

            Console.Write("Base GET");

            return 10;

        }

        set

        {

            Console.Write("Base SET");

        }

    }

}

class Derived : Base

{

    public override int X

    {

        get

        {

            Console.Write("Derived GET");

            return 10;

        }

        set

        {

            Console.Write("Derived SET");

        }

    }

}

class MyClient

{

    public static void Main()

    {

        Base b1 = new Derived();

        b1.X = 10;

        Response.Write(b1.X);//Displays 'Derived SET Derived GET 10'

    }

}

Abstract Properties


A property inside a class can be declared as abstract by using the keyword abstract. Remember that an abstract property in a class carries no code at all. The get/set accessors are simply represented with a semicolon. In the derived class we must implement both set and get assessors. 


If the abstract class contains only set accessor, we can implement only set in the derived class. 


The following program shows an abstract property in action. 


using System;

abstract class Abstract

{

    public abstract int X

    {

        get;

        set;

    }

}

class Concrete : Abstract

    {

    public override int X

    {

        get

        {

            Response.Write(" GET");

            return 10;

        }

        set

        {

            Response.Write(" SET");

        }

    }

}

class MyClient

{

    public static void Main()

    {

        Concrete c1 = new Concrete();

        c1.X = 10;

        Response.Write(c1.X);//Displays 'SET GET 10'

    }


The properties are an important features added in language level inside C#. They are very useful in GUI programming. Remember that the compiler actually generates the appropriate getter and setter methods when it parses the C# property syntax.


Friday, October 10, 2008

Showing line numbers in Visual Studio.NET

There have so many people like to see line number along with code in the left so as to they can easily found error and it is easer to remember where my code is but also to use the ctrl + g (goto line number) shortcut. By default this feature is disabled but luckely it's quite easy to turn it on.

Just navigate to the menu, choose Tools | Options and expand the Text editor node in the treeview on the left like shown in Figure 1:


Figure 1: The expanded Text Editor part.

In Figure 1 it is showing All languages node or the node of the language that you're interested in and check the Line numbers checkbox. Click the OK button and you have the line numbers appearing in your source view.


Tuesday, August 19, 2008

Control sql server through command prompt

Following are listing of Sql command to handle sql server from command prompt
(In case of sql server 2000 use osql,and sqlcmd for 2005)

usage: Sqlcmd            [-U login id]          [-P password]
  [-S server]            [-H hostname]          [-E trusted connection]
  [-d use database name] [-l login timeout]     [-t query timeout]
  [-h headers]           [-s colseparator]      [-w screen width]
  [-a packetsize]        [-e echo input]        [-I Enable Quoted Identifiers]
  [-c cmdend]            [-L[c] list servers[clean output]]
  [-q "cmdline query"]   [-Q "cmdline query" and exit]
  [-m errorlevel]        [-V severitylevel]     [-W remove trailing spaces]
  [-u unicode output]    [-r[0|1] msgs to stderr]
  [-i inputfile]         [-o outputfile]        [-z new password]
  [-f <codepage> | i:<codepage>[,o:<codepage>]] [-Z new password and exit]
  [-k[1|2] remove[replace] control characters]
  [-y variable length type display width]
  [-Y fixed length type display width]
  [-p[1] print statistics[colon format]]
  [-R use client regional setting]
  [-b On error batch abort]
  [-v var = "value"...]  [-A dedicated admin connection]
  [-X[1] disable commands, startup script, environment variables [and exit]]
  [-x disable variable substitution]
  [-? show syntax summary]

The example below shows how to handle sql server
First of all to open the command promt go through the following process
Click on start->then Run->type cmd->Press enter->now you can see a command promt window.

1->Example to show server name and version of sql server in 2005)
Type the Following command to command prompt nothing else.
SQLCMD -S P13 -E
1> select @@servername
2> Select @@version
3> go
Note:->Here P13 indicate server name and E for windows authentication.
(N.B->Just use OSQL instead of SQLCMD in case of 2000 server)

Alternative way.
SQLCMD -U sa -P sa -Q"Select @@servername"
(N.B->Just use OSQL instead of SQLCMD in case of 2000 server)
Note:->Here sa= your sql server username and sa your sql server password.

2->Example to changes the default database to 'master':
SQLCMD -d master -U sa -P sa -Q"EXEC sp_defaultdb 'MyLogin','master'"
(N.B->Just use OSQL instead of SQLCMD in case of 2000 server)
Note:->Here sa= your sql server username and sa your sql server password
(N.B->To come out from a command you can type quit)

2->Example to changes the any database to 'any database':
SQLCMD -d osaosa -U sa -P sa -Q"EXEC sp_renamedb 'olddb', 'newdb'"
(N.B->Just use OSQL instead of SQLCMD in case of 2000 server)
Note:->Here sa= your sql server username and sa your sql server password

Saturday, June 28, 2008

The RIGHT way to use checkboxes in a .NET Repeater!

The Code-Behind


Here retrieve checkbox value in case of repeater


public void DoSend(object sender, EventArgs e)
{.

foreach (RepeaterItem i in customerList.Items)
{.

//Retrieve the state of the CheckBox.

CheckBox cb = (CheckBox)i.FindControl("selectUser");.

if (cb.Checked)
{.

//Retrieve the value associated with that CheckBox.

HiddenField hiddenEmail = (HiddenField)i.FindControl("hiddenEmail");.


//Now we can use that value to do whatever we want.

SendWelcomeMessage(hiddenEmail.Value);.

}
}.

}.


Thursday, May 15, 2008

Entry for Run Function

Commands for some Management Consoles (msc extension required)


Entry for Run Function


ciadv.msc Manages the Indexing Service.

compmgmt.msc Computer Management Console. It contains a number of the other consoles.

devmgmt.msc Device Manager.

dfrg.msc Disk Defragmenter.

diskmgmt.msc Disk Management.

gpedit.msc Group Policy Editor. Windows XP Professional only.

services.msc Manages the many services involved in Windows and installed software.


Opening applications in Run

Entry for Run Function


calc => Opens calculator.

cmd => Opens command prompt window.

explorer => Opens Windows explorer.

magnify => Screen magnifier accessory.

msconfig => System Configuration Utility.

mshearts => Opens Hearts game.

msinfo32 => System Information applet.

mspaint => Opens graphics accessory Paint.

notepad => Notepad accessory.

regedit => Registry editor.

sol => Opens Classical Solitaire game.


Sunday, May 11, 2008

Htaccess

In general, we should never use .htaccess files unless we don't have access to the main server configuration file.
.htaccess files should be used in a case where the content providers need to make configuration changes to the server

Here are few rewrite rule has been listed which have to kept in .htaccess file, to get effect
Note:Sometime for use of .htaccess file css and image are not comming.So to prevent that we have to use rewrite rule in the htaccess file that rewrite rule also listed here.
REDIRECT NON WWW URL TO WWW URL
RewriteCond %{HTTP_HOST} ^example.com [NC]
RewriteRule ^(.*)$ http://www.example.com/$1 [L,R=301]
If Any Error occure then redirect it to a specified page
ErrorDocument 400 /root_path/page name(error.php?error_id=400)
ErrorDocument 401 /root_path/page name(error.php?error_id=401)
ErrorDocument 403 /root_path/page name(error.php?error_id=403)
ErrorDocument 404 /root_path/page name(error.php?error_id=404
ErrorDocument 405 /root_path/page name(error.php?error_id=405
ErrorDocument 408 /root_path/page name(error.php?error_id=408
ErrorDocument 415 /root_path/page name(error.php?error_id=415
ErrorDocument 500 /root_path/page name(error.php?error_id=500
ErrorDocument 501 /root_path/page name(error.php?error_id=501
ErrorDocument 502 /root_path/page name(error.php?error_id=502
ErrorDocument 503 /root_path/page name(error.php?error_id=503
ErrorDocument 505 /root_path/page name(error.php?error_id=505
ErrorDocument 504 /root_path/page name(error.php?error_id=504

HomePage Redirection
RewriteRule ^(demo\.php)?$ root_path/index.php [L]

HTMLPage Redirection
RewriteRule prefix_name_([0-9]+)_([0-9]+)_([0-9]+).html$ root_path
/pagename?ist_arg=$1&2nd_arg=$2&3rd_argD=$3 [L]

RewriteRule prefix_name_([0-9]+)_([0-9]+)/([^/]*).html$
root_path/pagename?ist_arg=$1&2nd_arg=$2&3rd_argD=$3 [L]

RewriteRule prefix_name_([0-9]+)/([^/]*).html$
root_path/pagename?ist_arg=$1 [L]

Extension Change Redirection
RewriteRule page.html$ root_path/pagename.php?arch=1 [L]

RewriteRule prefix_name_([^/]*)_([0-9]+).html$ root_path/pagename.php?2nd_arg=$2 [L]

RewriteRule prefix_name_([^/]*).html$ root_path/pagename.php?ist_arg=$1 [L]

Rewrite a profile page with htaccess
RewriteRule wordphase/([^/]*)$ pagename.php?qs=$1

If css is not comming rewrite page with htaccess
RewriteRule ^.*/css/style.css$ css/style.css

If image is not comming rewrite page with htaccess
RewriteRule ^.*/images/([^/]*)\.(jpggifpngsvg)$ images/$1.$2

How to rewrite Capital Letter file name to small file name
rewriterule ([^A]*)A(.*) $1a$2
rewriterule ([^B]*)B(.*) $1b$2
rewriterule ([^C]*)C(.*) $1c$2
rewriterule ([^D]*)D(.*) $1d$2
rewriterule ([^E]*)E(.*) $1e$2
rewriterule ([^F]*)F(.*) $1f$2
rewriterule ([^G]*)G(.*) $1g$2
rewriterule ([^H]*)H(.*) $1h$2
rewriterule ([^I]*)I(.*) $1i$2
rewriterule ([^J]*)J(.*) $1j$2
rewriterule ([^K]*)K(.*) $1k$2
rewriterule ([^L]*)L(.*) $1l$2
rewriterule ([^M]*)M(.*) $1m$2
rewriterule ([^N]*)N(.*) $1n$2
rewriterule ([^O]*)O(.*) $1o$2
rewriterule ([^P]*)P(.*) $1p$2
rewriterule ([^Q]*)Q(.*) $1q$2
rewriterule ([^R]*)R(.*) $1r$2
rewriterule ([^S]*)S(.*) $1s$2
rewriterule ([^T]*)T(.*) $1t$2
rewriterule ([^U]*)U(.*) $1u$2
rewriterule ([^V]*)V(.*) $1v$2
rewriterule ([^W]*)W(.*) $1w$2
rewriterule ([^X]*)X(.*) $1x$2
rewriterule ([^Y]*)Y(.*) $1y$2
rewriterule ([^Z]*)Z(.*) $1z$2

Tuesday, March 4, 2008

Dynamic Html

Dynamic HTML, or DHTML, is a collection of technologies used together to create interactive and animated web sites.
Dynamic Html use Html,javascript,css,Document Object Model.
Nowadays dynamic html heavily used in dynamic website.
To create a dynamic html first you have to create a body object

var body = document.getElementsByTagName("body")[0];=>get the reference for the body
If a document need to keep more than one dynamic html at that moment we just keep a table tag and inside of it take a tbody tag with a specific id.
In the form we can do this..

Now we will use the above tbody object to append the child.
In case of mozila we use createElementNS() and for other createElement()
createElementNS() method creates an element node with a namespace.
createElementNS(ns,name)
Where ns =A string that specifies the namespace name for the element node
name =A string that specifies the name for the element node

Here we have to remember one thing:- thead,tbody,tfoot all are append with table.
Where thead is used for table header
tbody is used for table body
tfoot is used for table footer

One Example has been given bellow how to create dynamic html?
var tbl = document.createElement("table"); =>creates a table element.
var tblBody = document.createElement("tbody");=>creates a tbody element.
var row = document.createElement("tr");=>creates a table row.
var cell = document.createElement("td");=>Create a element cell that mean table column.
var cellText = document.createTextNode("Text");=>Create a node and make the text.
Now we will append element with its parrent.
cell.appendChild(cellText);=>Append text to the td
row.appendChild(cell);=>Append td to the row.
tblBody.appendChild(row);=>Append row to the table body.
tbl.appendChild(tblBody);=>Append table body to the table.
body.appendChild(tbl);=>Append table to the body.
tbl.setAttribute("border", "2");=>sets the border attribute of tbl to 2.

We can dynamically also create html control like the following way.

Create TextBox Control
objTextBoxNode = document.createElement("input");
objTextBoxNode.id = "txtName";
objTextBoxNode.value = "Priyabrata";

In the above syntax a TextBox element will be created with the id ="txtName" and value =Priyabrata.

Create CheckBox Control.
objCheckBoxNode = document.createElement("input");
objCheckBoxNode.id = "chkName";
objCheckBoxNode.value = "Yes";
objCheckBoxNode.checked = true;

In the above syntax a CheckBox element will be created with the id ="chkName" and value =Yes.It is by default checked.

Create Button Control.
objButtonNode = document.createElement("input");
objButtonNode.id = "btnName";
objButtonNode.value = "Add";
objButtonNode.onclick = function addFunction(){} Here we can write down the add syntax

In the above syntax a Button element will be created with the id ="btnName" and value ="Add".Here also attach a onclick event which call a function addFunction().

To Remove a element from the dynamic component we have to reach their top most parent and remove the required html component.

Note:At the time of remove a dynamic component we have to rememebr that if we want to remove that dynamic component then instead of declare the component as object we have to declare it as var otherwise we will get an exception and no component will be deleted.

For example
objDivElement = documents.getElementsByTagName("div");
here we create div object.
To get how many div element of a document we can use.
objLength = objDivElement.length;

How to create a clone node of an object

Suppose we want to create a clone node of objDivElement then...
objCloneNode = document.cloneNode(objDivElement);
objCloneNode.style.position = 'absolute';
objCloneNode.style.top = parseInt(startY) + 'px';
objCloneNode.style.left = parseInt(startX) + 'px';
document.body.appendChild(objCloneNode);
document.onmousemove = Drag;
document.onmouseup = Drop;

Sunday, March 2, 2008

Javascript

How to call Client side code from server side

How to show message If client is disabled a specified time

How to get input element value which stay inside a td
Say the html is like following ..
1>first create the table object
objTable = document.getElementById("TABLEID");
objTR = objTable.getElementsByTagName("tr")[0];
objTD = objTR.getElementsByTagName("td")[0];
objInput = objTD.getElementsByTagName("INPUT")[0];
alert(objInput.value);
Result:test
How to get parent node from a click event
click event fire here In the above structure we will find a parent element from a click event.
Javascript Object
1.ArraYObj = {}; =>In javascript this way we can define an array obj
2.ArrayObj = new Array();
obj = function(){}=>This way we can define a function and here the function behave as object
Note:1.An element's offsetLeft and offsetTop properties return the pixel distance the element is offset from its offsetParent.The main offsetParent is body but
In the above ex referenc to the image id offset parent is <td>

After creating a event object in the following way we can call a function at the time of fire an event.

eventobj = document.getElementById('testeventid');
eventobj["onclick"] = function() { alert("ok");};
eventobj["onmouseover"] = function() { alert("bk");};

Singletone javascript function


In Javascript we can alocate a value into a member of an object and simultaneously call a function like the following way
testFunction().value2 = "test";

Sunday, February 17, 2008

Jquery

Css Work

$.ajax(properties)

$.ajax() returns the XMLHttpRequest that it creates

Supported datatypes are (see dataType option):

"xml": Returns a XML document that can be processed via jQuery.

"html": Returns HTML as plain text, included script tags are evaluated.

"script": Evaluates the response as Javascript and returns it as plain text.

"json": Evaluates the response as JSON and returns a Javascript Object

$.ajax() takes one argument, an object of key/value pairs, that are used to initalize and handle the request.

Example

Sends an xml document as data to the server. By setting the processData option to false, the automatic conversion of data to strings is prevented.

jQuery Code

var xmlDocument = [create xml document];
$.ajax({
url: "page.php",
processData: false,
data: xmlDocument,
success: handleResponse
});


$get and $find ASP.NET AJAX Shortcut Functions
If we go through Asp.Net Ajax Component then we must getting $get and $find JavaScript shortcut functions.

$get can be used as shorthand for the document.getElementById and element.getElementById functions.

Syntax
$get("id","element")
id=>Id of the document element to find.
element=>The parent element to search.The default is the document
element.

If we go through $get function then we will find out

function get(id, element)
{
// validation code that was removed

if (!element) return document.getElementById(id);
if (element.getElementById) return element.getElementById(id);

// manual DOM walk that was removed ...
}

Following an example that change the color of the bellow text.

Example1

<div id="div">We can change the color of the text by clicking the buttons</div>

function changeColor(color)
{
// fetch the div
var div = $get('div');

// set the color to the provided value
div.style.color = color;
}

Example2

<asp:Label ID="label" runat="server" Text="We can change the color of the text by clicking the buttons" />


function changeColor(color)
{
// fetch the div
var div = $get('<%= this.label.ClientID %>');

// set the color to the provided value
div.style.color = color;
}

Example3

<span id="ctl00_ContentPlaceHolder1_label">Some sample text. You can change the color of the text by clicking the buttons</span>


function changeColor(color)
{
// fetch the div
var div = $get('ctl00_ContentPlaceHolder1_label');

// set the color to the provided value
div.style.color = color;
}


$find

The $find shortcut function allows you to look up an ASP.NET AJAX client side Component by it's ID.

Syntax

Arguments


id =>A string that contains the ID of the component to find.
parent=>(Optional) The component or element that contains the component to find.

Return Value


A Component object that contains the component with the specified ID, if found; otherwise, null.

<%-- The behavior for this extender can be fetched using the following syntax:     
var behavior = $find('rce1ID');
--%>
<ajaxToolkit:ResizableControlExtender ID="rce1ID" runat="server" ... />
<%--
The behavior for this extender can be fetched using the following syntax:
var behavior = $find('rceBehaviorID');
--%>

<ajaxToolkit:ResizableControlExtender ID="rce2ID" BehaviorID="rceBehaviorID" runat="server" ... />

Here is the JavaScript the ASP.NET AJAX runtime injects into the page to initialize these components.  Notice the value of the id attribute in the JSON:


<script type="text/javascript">  
<!--
Sys.Application.initialize();
Sys.Application.add_init(function()
{
$create(
AjaxControlToolkit.ResizableControlBehavior,
{
"ClientStateFieldID":"rce1ID_ClientState",
"HandleCssClass":"handleImage",
"id"":"rce1ID"
},
null, null, $get("pnl"));
});

Sys.Application.add_init(function()
{
$create(
AjaxControlToolkit.ResizableControlBehavior,
{
"ClientStateFieldID":"rce2ID_ClientState",
"HandleCssClass":"handleImage",
"id":"rceBehaviorID"
},
null, null, $get("pnl"));
});
// -->
</script>