1>First create a project and make the application
2>Do unit testing so as to the application run correct.
After you have developed your windows apllication,now you want to make a exe.how can?
These steps are gives the guidance to you…
3>Go to file menu > click Add > new project >now "Add New Project" Dialog appear
4.Select "Other Project Types" and click "Setup and Deployment' projects,Choose "Setup Project" give name project name in name text box finally click OK.
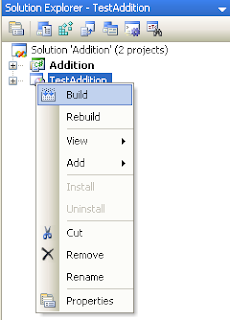
5.New project appear in solution explorer,for example you give the name "TestAddition"..it will display with this name.
6.Right click the TestAddition > go View > click "File System"
7.You can see the "File System on TargetMachine" under three folders Application Folder, User’s Desktop, User’s Program Menu.
8.Select Application Folder and right click Add>Project Output>select Primary output
9.Select User’s Desktop richt click on the second window>click create new shortcut>select output file from Application folder>change the file name from primary output name to MyEXE.Click on next >> same procedure follows the user’s program menu also
9.If you want to change the Manufactures name for exe,just right click the project go to properties change the properties as per you requirement
10>Finally Build the new project After successfully Build the project myEXE(Setup) will be appear in Application Debug or Release folder(depend upon the properties settings)
EXE available @ this location
To find your exe location go the project folder.there have one more folder created with the name of your exe.
Enter the folder there you find Debug folder.Now you found your exe or set up file.
When you want to install the EXE on the client machine,you should be installed .NET Framework on that mc because,Applications and controls written for the .NET Framework version 2.0 require the .NET Framework Redistributable Package version 2.0 to be installed on the computer where the application or control runs.
How To add windows service into the service list
1>First create a windows service application.
2>project/bin/debug folder exe will be created .
3>Open the visual studio command prompt
4>Navigate to the service exe path
5>Type Installutil SERVICENAME.exe
6>Enter
How To de register windows service from the service list
1>Go to command prompt and type
2>sc delete SERVICENAME


6 comments:
Thanks brother for guide. I really love it. What my sql file that i connected to .net project. Do i need to copy or not? Pls explain. Thanks
8.Select Application Folder and right click Add>Project Output>select Primary output
hello boss after selecting project output it is not showing primary output option just simply showing one window . please help me
Hi im developed a application in C# and Backend is SQL Server ...I dont understand how sql support to .EXC file hw it work,do i want to install SQl also in machine in which i want to install my project setup file thax in advance
Thanks Buddy. Helped me a lot :))
Very nice information share in this blog, with .exe file we run application any supported platform or Operating System.
@Sachin:For website you dont need to keep the sql server in the server but for windows application it requires.
Post a Comment