Saturday, February 25, 2012

How to create windows service & Setup file

Windows service is a service which enable us to create a long running executable application.Sometimes it is needed that one process will be executed in daily basis in that situation we can use windows service.To create a windows service we need to follow the following steps..
1>Create a windows service application by navigating ..
File->New->Project[See FIG-1]
FIG-1

2>Rename the service1 to appropiate service name.

3>Now open the service in design view.
4>Click on properties window.
5>Change the Name and service name property with the desired name.

6>Now open the service in design mode.
7>Right click on the design mode and click on Add Installer.

8>Two file[serviceProcessInstaller1,serviceInstaller] will be created.

9>Right click on serviceProcessInstaller and click on properties and change the account to LocalSysytem.

10>Now right click on serviceInstaller and change the SratType Property to Automatic and DisplayName to Service name

Now to create the setup file we need to follow the following steps..
1>Create a setup project in the same solution.

2>We can see Output file system structure by navigating the steps
Right CLick on Setup Project->View->File Sysytem

3>From the File system structure right click on the Application Folder->
Add->Project Output-Select Primary output->OK

4>Rightclick on set up project->View->Custom Action

5>In custom action interface Right click on Install->Add Custom Action
->Double click on application folder->Select The Primary output file

6>DO the step 5 for Uninstall
In custom action interface Right click on Uninstall->Add Custom Action
->Double click on application folder->Select The Primary output file
7>Open the ProjectInstaller.cs and add following line

8>Now build the project and build the set up project
Now Add code to test the service.
1>Open the service by right click on it and select view code.

2>Add the following code to test the service.
3>Right click on setup->Install->Specify Install Directory->Next->Service will be install into the windows service
4>To view the service RUN->Type->Services.msc
we can find our service

Saturday, November 5, 2011

SSIS Lookup Control Implementation

SSIS CONTROL EXPLANATION
SSIS[SQL Server Integration Services] Brief:
To work with SSIS we need to install SQL Server Business Intelligence Development studio.
When we open a package in the BIDS tool we get 3 tabs.
i)Control Flow.ii)Data Flow.iii)Event Handler.
In Control Flow section we do some control operation like Execute Task,Data Flow task,Foreachloop Container and so on and In Data Flow control we do data conversion,data transformation,data manipulation .

Here in the following I have demonstrate how to use Lookup control.
1>First take a Execute SQL Task in Control Flow tab.
2>Right click on the interface to add variable.

3>Right click on the Execute SQL Task. Select the connection. Select the source type. Here we can Put direct input as well as variable .In case of variable point the variable from the drop down.

4>Take a Data Flow task. Double click on it Data Flow control tab open.
5>In Data Flow control take a Excell Source. Right click on it and add the connection manager.

6> Select Colum from the left navigation. Select those column which we want to pass.

7>Now take a Data Conversion control. Right click on it and specify the destination data type.If Destination data type is varchar then it will be string[DT_STR]]
8>Now take a Lookup control select General. Specify Cache Mode as No Cache and Redirects Rows to match output.

9>Select Connection tab from left navigation. Specify the connection manager and chose the table on which the lookup will be perform.
10>Select Columns from the left navigation and specify which field are taken place for lookup comparison.

11>Now from the lookup control one destination is taken for match rows and another destination is Taken for unmatched rows.

12>In the above picture two derived column is taken. One derived column is taken to specify data conversion error and another is taken to specify data conversion error. One Union ALL control is taken Which accumulate all the error and sent to a flat file destination .

Saturday, September 10, 2011

Page Life Cycle

Here I have listed how the event is fire in page life cycle
OnInit Event Fire On a Page Life Cycle
i) Master Page User Control-init
ii) Page User COntrol-init
iii)Master Page -init
iv) Page - init

Page Load Event Fire On A Page life Cycle.
i) Page -Load
ii) Master Page-Load
iii)Page User Control - Load
iv) Master page User COntrol - Load

Data Binding Event Fire On A Page Life Cycle
i) Page - DataBinding
ii) Master Page - DataBinding
iii)Page User Control - Data Binding
iv) Master Page User COntrol - DataBinding

Unload Event Fire On A Page life Cycle
i) Master Page User Control-Unload
ii) Page User Control-Unload
iii)Master Page -Unload
iv) Page - Unload

A pictorial Presentation Of page life Cycle

Saturday, March 5, 2011

Why Breakpoints are not working in Visual Studio .net

How to see Breakpoint Window
To see breakpoint window we need to navigate Debugg->Windows->Breakpoint
Sometimes breakpoint not work because of code owner make debugg settings like "Enable Just My Code(Manage Only)" ,as a result of it other people when they try to debugg the code they unable to debugg the code. To Enable the debugger we need to navigate Debugg=>Options & Settings and Uncheked the "Enable Just My Code(Manage Only)" checkbox.

First we need to go Project properties and enable the debugging
1>Rigth click on the project in solution explorer.
2>click on the property pages.
3>click on the Web option tab.
4>Under debugger make sure that Asp.net checkbox is checked.


Here we need to ensure that project is running from "IIS Web Server" instead of "Visual Studio Development Server"
Then we need to enable debugging in the web.config file.
1>open the config file .
2>set the debugg=true

Now enable the Asp debugging
1>Right click on the iis=>Default Web site
2>Click home directory tab and then click on the configuration
3>Click the Debugging tab, and then select the Enable ASP server-side script debugging check box.

4>click on Send detailed ASP error messages to client if
we want the detailed of the debugging information
5>click Ok

Sunday, September 5, 2010

TypeDataset

How to create typed Dataset
1>First create a table with sql server enterprise manager
Say we have created a table with name member which have a following filed
:=>PKID(Int),MemberID(bigint),Name(Varchar),Salary(float),SalaryType(bit).

2>Enter few records into the table.
3>Now open the visual studio .net editor.
4>Craete a new asp.net web site.
5>In Solution Explorer, right-click to add a new item, and select DataSet. Give it the name MemberDataSet.xsd. Visual Studio will recommend placing the DataSet file inside the App_Code folder, which you should allow it to do for you.
6>Now cancel the connection interface which will open as default.
7>Open the server explorer.drag table into the design window.
8>Now right ckick on the TableAdaptor=>click on configure.
9>Customize the query accordingly=>Click Next=>Specify the Method name=>Click next=>Click Next.
10>Now come to the code behind and add the following code.

The way out in which not need to create any connection.

the way out in which need to create connection.

//Person Table first row name collumn
//objDS.Person[0].Name = 1;
//It will generate compile time error.

Monday, July 12, 2010

How HttpHandlers work with Example

Watermarking PDF documents using HttpHandlers
Whenever we work with Httphandler we have to inherit IHttpHandler.
We will be unable to inherit IHttpHandler unless & until we add System.web as references.
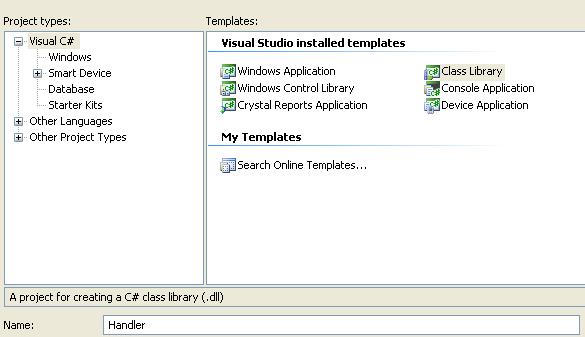
1>Create a class library with the name Handler

2>Rename the class1.cs with required Class and here it is PdfHandler.

3>Add IHttpHandler interface.If any problem occured just ad the reference System.web from .Net tab listing.

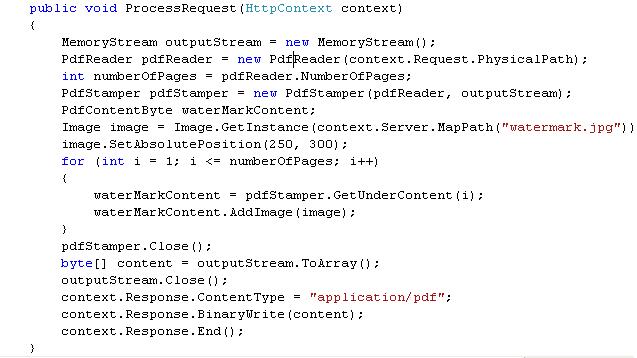
4>Add ProcessRequest and IsReusable Method.

5>Download the iTextSharp.dll and add it to references so as to pdf related function can work.
6>Build the class library.After successfully build dll will be generated.
7>Create a new website TestPdfRender and add the binary output of the custom handler as a reference.

8>Add the handler to the web.config.

9>To map the .pdf extension through IIS: within IIS, right click on TestPdfRender->properties->under Directory tab, click on configuration->add a new extension with extension .pdf and set Executable to the .NET runtime ("c:\windows\microsoft.net\framework\v2.0.50727\aspnet_isapi.dll")

keep the rest of the sections to their default values.
Click on OK to close all the open configuration windows.
Note:here IIS 6 have one error after selecting the dll at once ok button is not being enable.Just click on the executable text box then ok button is enable.

10>Now the application is ready for testing.open the default.aspx and add this test hyperlink control:

11>Genereated output is.

Saturday, July 3, 2010

How to Create Custom Tag Library

How to Create Custom Tag Library

1>Create a java file by select application=>New=>class
Here 2 java file has been created one is memberInfo and another is FeedbackInfo.MemberInfo contain member information and FeedbackInfo contain member feedback information.For a specific member there may be number of feedback.

MemberInfo.java

FeedbackInfo.java

2>Create tld file and keep it into WEB-INF/tld directory
Two tld file has been created for tow java files.One is MemberInfo.tld and another is MemberFeedbackInfo.tld.

MemberInfo.tld

MemberFeedbackInfo.tld

3>Create a jsp page and assign require tld on the top of the page.

4>Project folder structure